First Smocking Project Completed – Yahoo!
 In September I walked into the Fabric Addict in Lethbridge (the day after our arrival) and there sat a new shipment of smocking pleaters waiting to be unpacked. Now I have been thinking about exploring this media for a while. It’s one of the few things I have never tackled, mainly because my Mother smocked dresses for two generations of girls in the family and I didn’t want to tread on her space. She passed away last spring and I’ve been thinking it was time to pick up the gauntlet and learn this craft. Especially now that I have a granddaughter and two great nieces all under a year of age!
Needless to say, other projects went on hold as I researched smocking on line, learned how to use the pleater, worked a sampler of basic stitches and prepared fabric from my stash for pleating!
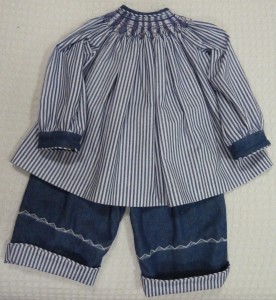
For my first project I chose a striped fabric, cotton, but a firm weave – of course I didn’t think ease of pleating – part of the learning curve! I choose a bishop pattern from one of the Smocking magazines I had purchased and prepared the pattern and cut out the pieces (Peaches & Cream, Simela Constant of Australia, Smocking and Embroidery, Issue 85). Now a bishop style smock or dress must be stitched together at the armholes before pleating so that the stitching is continuous all around the neckline. No problem. However by this point I had been working, thinking, breathing smocking for 12 hours and I turned the top the wrong way and by the time I realized my mistake and found that I had to start again, I had to dismantle the pleater to release the fabric. Twelve broken pleater needles later I had successfully pleated the required area. Only I had forgotten that I was working with half spaces not full spaces and hadn’t used enough rows! At this point, I was glad I had left my name for a class at the store! Replacement needles and a book giving more detailed info about using a pleater are on order!

Simple Stitches – but it works!
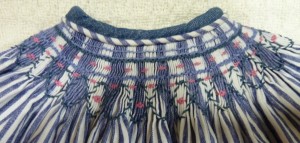
Not to be daunted, I decided to use the prepared rows and create my own smocking plate (pattern to the none smockers among you!). I faithfully blocked the smocking gathers according to the instructions and started to stitch. I love doing smocking! I always enjoyed embroidery but wow!
Stitching completed I started the assembly of the top and companion pants. I really was thinking like a frog as going by instinct didn’t work and ripit became the mantra of the day! However, this exercise served as a great refresher course in clothing construction techniques and when to check twice and when to read ahead in the pattern instructions!
All that to say that yesterday I completed the two piece outfit in a 12 month size. It is based on Australian standard sizes and looks large. Can anyone help me compare this sizing system to the Canadian or USA system?

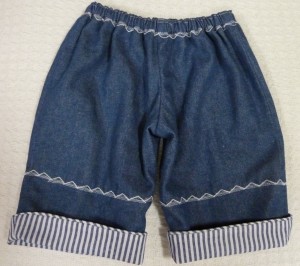
Because the pattern called for full lining in the pants and I didn’t have enough fabric left, I did some adaptation, using a decorative stitch from my machine to stitch the top of the partial lining used to create the cuff effect at the bottom of the legs and then echoed the design to attach the turn down for elastic at the waist. I really like the effect. I also like the effect of the self cording used at the neckline, cuffs – arms and legs. I must remember this as I’m not a frills and lace person and cording may be something that I will want to use in the future.
I need to take a break for a couple of days and get some errands done but I’m already planning the next project. Classes have started so I will be able to get some of my questions answered. I want to get three projects together before I decide who gets what….
